Hello again Bombshell baberonis.
By now we have cut our fabric and assembled our back pieces. Some of us have already skipped to the end and made a finished suit. I call your attention to Katie's knockout version here. Her pinup backyard photoshoot made my day yesterday.
Today we are going to prep our front lining for all views and the View A bust. First things first: place your front lining piece good sign down on your work surface, and align your fabric good side up on top of it. Use frequent pins to attach the lining to the fabric crotch.

For views B &C, you can ignore the next step about the darts. Just baste your lining to your fabric and skip down to the next paragraph.
For view A, we need to sew the darts. Since you will not see the lining, you don't need to worry about having a perfectly tapered dart. Just sew up that triangle so your front lining looks like this:

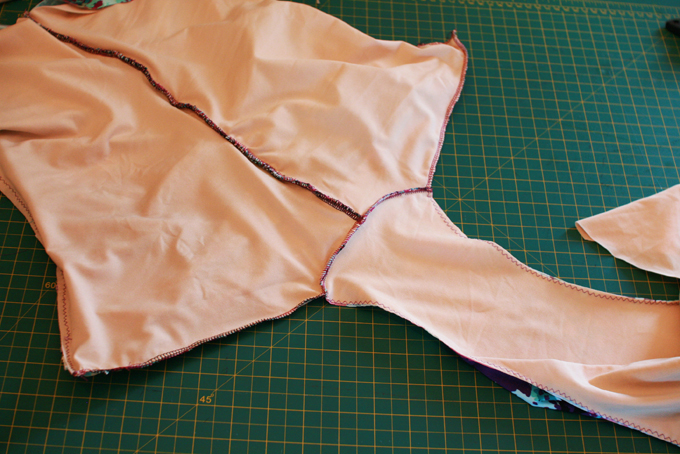
ALL VIEWS: Now we will be attaching the front lining to the ruched back piece we assembled yesterday. With the good sides of your fabric together, serge or zig zag your crotch seam. Carolyn pointed out during pattern testing that for a nicer finish inside, you could encase the crotch seam. To achieve that, prior to sewing your fabric crotch to your lining, you would sandwich the back crotch seam in between your fabric and lining and then sew. You would then flip both pieces over and THEN baste them together. Personally it doesn't bother me to have an exposed crotch seam. It's your call. Using the method I call for in the instructions would look like this:
Next up, we are going to prepare the front fabric piece. Draw a line using a piece of tailors chalk (or other transient marking tool) down the centre of your top bust on the wrong side of the fabric, stopping where the pattern piece marking indicates.


Now is the time to make the front bust tab. Fold the tab lengthwise, good sides together, and serge or narrow zig zag the long ends together. Turn it inside out. You should now have a long fabric tube. Press this tube with the seam centered on the side you will not see.

Place this tab with the seam facing up on the good side of the fabric, lining up the edge of the the tab with the bottom of the continuous basting line you just sewed. Sew the tab down 1/4 inch from the basting line using a small straight stitch.

Grab the two bottom threads of your basting line and gently gather your bust. You want to gather it almost as much as you can but leave about a 1/2 inch of "wiggle" room. Later on we will be attaching the lining and elastic and we want to be able to fold over the fabric without having a bunch of ruching in the way. Tie a knot at the top of the bust ruching, ensuring that the wiggle room is maintained.

I was going to go over the suit assembly today, but I think it might be too much information for just one post. I'll be back Thursday to show everyone (all views) how to assemble your front and back pieces together.
Hopefully I'm not moving too slowly for you, but there is a lot of information to go through and I think it will be easier to digest in small chunks. See you tomorrow!


